Showing posts with label solidworks ontario. Show all posts

November 13, 2017

SOLIDWORKS YEAR END PROMOTION

SOLIDWORKS PROMOTION!!

Now Is the Time to Standardize on SOLIDWORKS®  Software…
Experience the benefits of SOLIDWORKS 3D today with significant savings!

Buy a license of SOLIDWORKS Premium or Professional and save big on the solution that's right for you.*


Buy one SW Premium or
SW Professional CAD license…
+
Get a second CAD license of equal or lesser value (SW Standard, Professional, or Premium) for only $1,500
+
Option to add one non-CAD product
to your order at 50% off list price
on that product*
OR
Buy one SW Premium (only)
CAD license…
+
Get an HP Z2 Mini
Workstation at no
additional cost

Are you tired of dealing with the complexities and inefficiencies of designing in a multi-CAD environment? With data reuse and migration tools from SOLIDWORKS, it's easier than ever to upgrade your legacy CAD data—created in
any system—to SOLIDWORKS.
Find out why SOLIDWORKS is the 3D CAD software of choice for over 3 million product designers and engineers worldwide.
Make the decision to consolidate your product development process on SOLIDWORKS and you'll get:
  • The ability to move from concept to production in no time with the flexibility in SOLIDWORKS solutions.
  • An integrated design-to-manufacturing system that enables you to take your product from concept to
    production faster and smarter than ever.
  • The largest and most passionate community of users to network, share and collaborate with.
ACT NOW!, and save big on the SOLIDWORKS solutions that are right for your business.

*Legal Terms and Conditions: Offer limited to one per customer location. Non-CAD product is defined as any product license on current price list other than SOLIDWORKS Standard, Professional or Premium. Offer valid from November 1 - November 30, 2017 in the U.S. Canada and Mexico only. Offer expires November 30, 2017 at 11:59pm Eastern Time and cannot be combined with any other discount or offer. Only newly acquired licenses ordered after 12:00 am Eastern Time on November 1, 2017 are eligible. Educational and Research licenses do not qualify for this offer. 

September 11, 2015

Discover SOLIDWORKS 2016

See What’s New in SOLIDWORKS 2016

Make Great Design Happen with SOLIDWORKS 2016

Register to see SOLIDWORKS 2016 LIVE!!


SOLIDWORKS® 2016 is finally here and it’s packed with new, customer-focused enhancements. Whether you design single components, incredibly complex equipment, or even entire facilities, SOLIDWORKS 2016 delivers easy-to-use tools to help turn your ideas into higher-quality products.
With SOLIDWORKS 2016, you can:
  • Solve complex design challenges faster and earlier
  • Streamline all your parallel design processes
  • Connect electrical and mechanical design
  • Collaborate and share data across multiple disciplines
  • Fast-track your designs to manufacturing
  • Focus on design, not on CAD
Focus on your design, not CAD software. Software doesn't design successful products, you do.

REGISTER TODAY TO SEE SOLIDWORKS 2016 LIVE   and to learn how SOLIDWORKS 2016 can help you work smarter, create innovative products faster, and stay focused on design, not on CAD.

REQUEST A QUOTE to learn more about SOLIDWORKS 2016 today!

LEARN HOW to maximize employee performance and get more from your technology investments. Special pricing is available on SOLIDWORKS 2016 certified HP Z Workstations powered by Intel® Core™ i7 processors.


Our Proud Co-Sponsors:


Ultrabook, Celeron, Celeron Inside, Core Inside, Intel, Intel Logo, Intel Atom, Intel Atom Inside, Intel Core, Intel Inside, Intel Inside Logo, Intel vPro, Itanium, Itanium Inside, Pentium, Pentium Inside, vPro Inside, Xeon, Xeon Phi, and Xeon Inside are trademarks of Intel Corporation in the U.S. and/or other countries.

August 18, 2015

Large Assemblies? No sweat!!

Large Assemblies

Projects can vary in size from small to large.  On occasion, the larger projects may demand larger models in order to capture the full scope of the project.  With increasingly complex models and intricate parts with many features it will invariably have an impact on your computer performance.  It is worth noting that there are simple tricks you can use to improve performance for large assemblies.

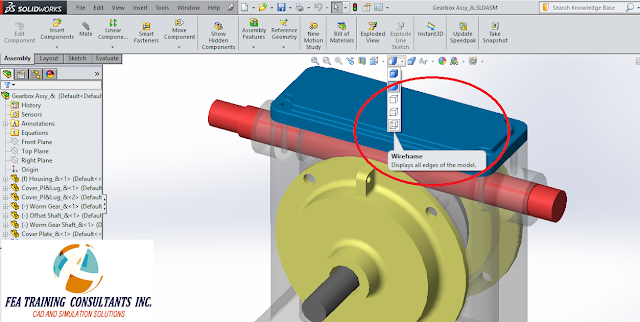
Change the display to Shaded or Wireframe

This is one of the simplest and easiest methods, simply drop down the view bar options and select either shaded or wireframe.  This can give a boost to performance.

large assembly solidworks


Set it to lightweight

When a component is set to fully resolved, all of the model data is loaded into memory.  When it is set to lightweight, only some of the model data is loaded into memory, the rest is loaded as required.  This applies to both parts and assemblies.  Consider the following gearbox assembly:

improve performance of large assembly solidworks


Right click on a component, in this case a part was chosen, and select component properties.

component properties large assembly solidworks


The component property box will appear where you can navigate to Suppression State and select Lightweight


large assemblies solidworks


In doing so the components will be set to lightweight, furthermore as a visual cue, SolidWorks modifies the part icon to include a feather to indicate that it is lightweight.

large assembly solidworks


Activate Large Assembly Mode

Large assembly mode is an optimized set of system settings that will improve performance for larger assemblies.  Upon opening an assembly a dialogue box will open when SolidWorks determines that the component is a large assembly (i.e. a threshold has been reached).  You may choose to accept large assembly mode by accepting the dialogue box.  Or you may manually turn on large assembly mode by going to tools > Large assembly mode 

large assembly mode


August 17, 2015

Applying Decals in SolidWorks

Using Decals

Solid Modeling has many stages and uses that include concept, design and final product.  Some solid models are used to convey information to a client or sometimes it is provided for marketing purposes.  In either case it is valuable to have a high fidelity model and sometimes that includes the application of Decals onto a solid body.  

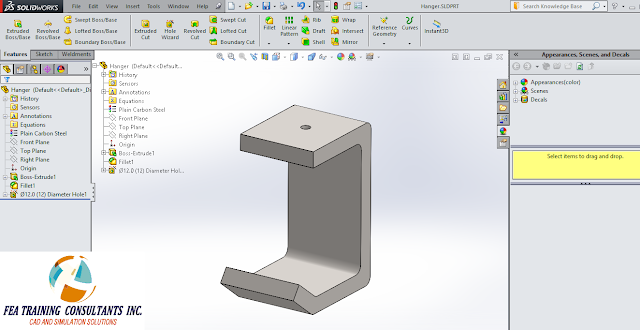
Consider the following bracket:

solidworks decal


In order to add a decal, expand the task menu and select Appearances, Scenes and Decals on the right hand side.  Browse through the decals an select the one you want.  In this case the SolidWorks decal will be applied.  Right click and select Add decal to part

decal in solidworks


The Decal property box will appear there it will provide a preview of the decal

decals solidworks


Select a face on the part to apply the decal. 

decals solidworks


  You’ll notice there is a triad available as well as resizing point around the perimeter of the decal.  This allows you to reposition and resize the decal to the proper size.  Once you as satisfied, select apply.

decals solidworks


This decal has been successfully applied.  However you may notice that the background color does not match the part color.  In order to make them match, a mask needs to be applied.
Select and applying a new decal for reference.
decals in solidworks


Scrolling down the decal property box you will find the Mask Image option.  Select “Selective Color Mask” and click on the eye dropper icon.  With the eye dropper icon selected, select the color which you would like to omit from the decal. i.e. make it transparent.  In this case white is chosen.

\decal solidworks


As a result the new decal has a mask successfully applied.  The inclusion of the mask makes the decal and model look cleaner.

August 14, 2015

Trim Tool in SolidWorks Weldments

Weldment: Trims

SolidWorks offers many tools that enable engineers to design innovative parts.  These tools range from basic feature creation, to specialized tools such as weldments.  A weldment is an object made of many parts welded together.  This can include but not limited to structural sections and plates.  The base concept of SolidWorks Weldment involves creating a base layout sketch and filling in the sketch with structural members.
 
When a structural member is applied it will most likely require trimming to fit the intended profile.  The Trim Tool is an invaluable tool to accomplish this task.  Trim has many similarities to sketch trim where it allows the user to change the end condition for each structural member.  If a member is too long or too short it may adjust it to suit.

However it is also worth noting that trim can be used in more creative ways as well.  Consider a simple fence as shown below:

trim tool solidworks


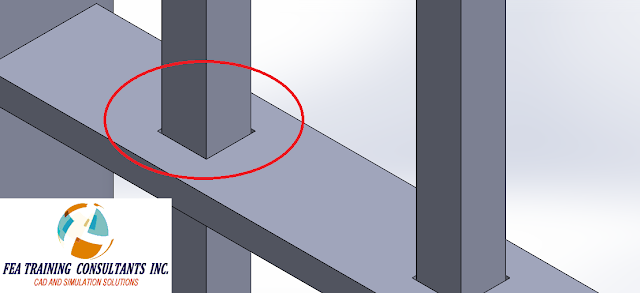
The fence is fully modeled in weldments; however the pickets are placed such that they are intersecting the crossbar thereby creating interference.

trim tool solidworks weldment


We can use the Trim tool within weldments to correct this interference.  By activating Trim and setting a weld gap, the program cuts a hole into the cross bar that includes a clearance the size of the specified weld gap.

trim tool


Not only can trim be used to adjust and modify structural member end conditions, but it can also create new features within a part such as a hole with clearance.

solidworks weldment trim tool


January 28, 2015

New in SolidWorks 2015- Sketching (Part 2)

New in SOLIDWORKS 2015 - SKETCHING


EQUIDISTANT POINTS AND SEGMENTS

You can create equidistant points and segments in a sketch. We will divide the line below in 5 segments using the Segment command highlighted in red box

SKETCH SOLIDWORKS


In the Segment tool we have to select the entity that we want to divide. Then we have the option to select Sketch points or Sketch segments and the number of instances. In our case we selected the line as the entity to divide and Sketch segment option with 5 segments to divide.


As shown below the line got divided into 5 segments and we can select any one of the segment. Here the first segment is selected and so it’s highlighted in orange color.


MIDPOINTLINE SOLIDWORKS


Below is an example of using Segment command with sketch point’s option. Here we are creating 8 points on the circle’s circumference.


As shown below when the circle is selected its one complete segment with 8 points distributed equally.


MIDPOINT LINE OPTION

There is a new type of line in the Line command and it’s the Midpoint line option as shown below. You can create a line that is symmetrical from the midpoint of the line


We started the sketch line from the origin using the Midpoint line option and as shown below it’s symmetrical on both sides from the origin.


LINE PROPERTIES SOLIDWORKS