SolidWorks Design Checker verifies design elements such as dimensioning
standards, fonts, materials, and sketches to ensure that SolidWorks documents
meet pre-defined design criteria.
Design Checker has the following modules:
Lets take a look at how to automatically fill the title block

Open a new drawing document. Note that you'll need to do this for each of the different sheet formats that you use. For this tip, in the Sheet Format/Size dialog box, make sure that the Standard sheet size radio button is selected and pick A - Landscape from the menu. Right below the menu is the name of the template, a - landscape.slddrt. If it's not, browse to that file. Make sure that Display sheet format is checked and click OK.


Design Checker has the following modules:
- Build Checks - can be used to set the requirements for evaluation
- Check Active Documents - used to validate documents
- Check against existing file - validate the active document against design checks created from existing files.
- Learn Checks wizard - retrieve design checks based on attributes from an existing SolidWorks part, assembly, or drawing document.
Lets take a look at how to automatically fill the title block
First
create a Part for which you wish to create a drawing. After creating the file save is
under a name in this case Part1 and then go to the File Properties as shown
below and click on it.
 |
Type
in the details you want to show in the Title Block . In this case I want the
Drawn By and the initial or the value is AVS. Once done click OK and
then save the file.

Open a new drawing document. Note that you'll need to do this for each of the different sheet formats that you use. For this tip, in the Sheet Format/Size dialog box, make sure that the Standard sheet size radio button is selected and pick A - Landscape from the menu. Right below the menu is the name of the template, a - landscape.slddrt. If it's not, browse to that file. Make sure that Display sheet format is checked and click OK.

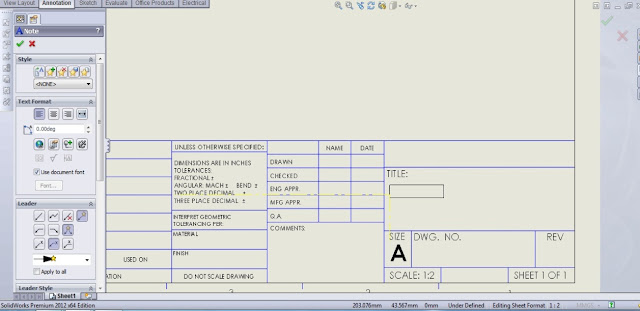
Right Click on the Sheet and select Edit Sheet
Format as shown below to make changes or edit the Title Block. Once you go into
Edit Sheet Format mode you won’t be able to see any drawing view, if there are
any on the sheet. The only thing that can be changed/modified is the Title
Block

Now select Note from the Annotation toolbar as shown below
and drop it next to Title in the Title Block. After dropping the note you migh
tsee the text editing bar pop out to make changes to Font type, size etc.


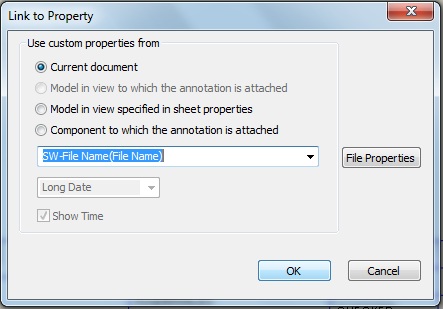
In the Note PropertyManager, under Text
Format, click the Link to Property button as shown below

In
the Link to Property dialog box, pick the Current document radio
button and select the SW-File name (File name) as shown below.

Now
you can see a code appearing in the text box and once you click OK, you will
see the file name in the text box as shown in the below image.

The name of the File is the
name that appears in the Text box and if you change the file name the text box
updates on its own.

Same
way you drop a text box beside Drawn By and select Link to Property and make
the selection’s as shown below.

Once the selections is done you can see the initial AVS from
the part file carried over in the Tiltle Block. Once you are done with setting
up the Title block you can click the Exit Button as shown in the box below to
come out of Edit Sheet Format.
Note: Sheet Format needs to be saved individually as its
independent from the Drawing Template. To save Sheet Format click on File-Save
Sheet Format and select the location you want it to be saved.

No comments:
Post a Comment