June 29, 2015

Application of Loads in SolidWorks Simulation

Simulation:  Application of Loads

 SolidWorks Simulation allows users to set up and run tests using finite element analysis (FEA).  The manner in which a user sets up a test will determine whether the results are an accurate result of real-world conditions.  (Also Read:Symmetry in SolidWorks Simulation -Guide to applying loads and restraints appropriately)
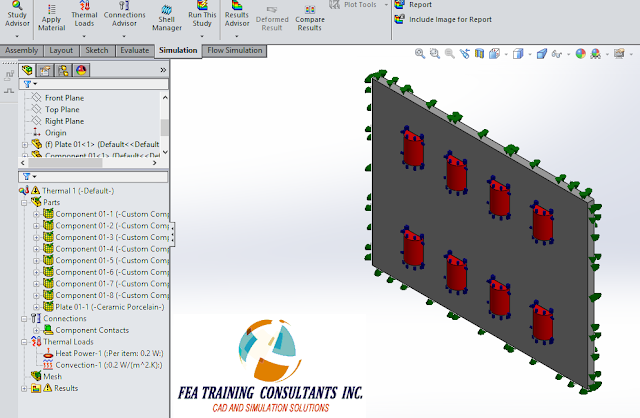
Consider the electrical component shown below.  The main grey surface consists of ceramic porcelain whereas the small red parts indicate components that generate heat on the board.  We are interested in the heat distribution for this part under working conditions.

application of loads in simulation


In order to set up the problem we define the material properties for each component.  This includes the red electrical components as well as the grey ceramic porcelain.  Following material definition, we define heat generation power of 0.2W for the red components and convection of 0.2 W/m^2 K for the outside surfaces.  The convection is a mechanism of heat transfer used to dissipate the heat.  

application of loads solidworks simulation


It is important to pay attention to detail when defining a simulation study.  Consider the definition of 0.2W heat generation for the red components.  The user must differentiate whether the heat generation is generated for each component or whether it is generated across the sum total of components.  This is an important distinguishing factor.  In this case it is set to “Per item” which is correct.

Furthermore, as a tip, if the user were to use symmetry to divide a heat generating part in half and the heat generation is defined in terms of Watts, it follows that the Watt value must also be divided by half since Watt is a total heat generating value.  The relationship is similar to that of force and pressure.

applying loads in solidworks simulation


Once the analysis is successfully set up we need to mesh the component.

loads in solidworks simulation


Once the component is meshed, we may run the analysis.  According to the conditions set for this thermal analysis we are seeing a maximum value of 460C occurring on the inner components.  The heat generated from the components travels outward to a temperature of 427C towards the outer edges of the ceramic porcelain.  

thermal analysis


The manner in which the simulation analysis was set up can greatly affect the results.  


June 19, 2015

Bolt Fracture

Case Study: Bolt Fracture 

Hardware such as bolts, nuts and washers are generally used for connections and fixtures.  They form an integral part of the component structural integrity.  Bolts are governed by standards such as ASTM and are typically stamped with an identifying marking on the head during the manufacturing process.  The bolts selected for any application typically take into account the manner in which it is applied while taking into account the most prevalent mode of failure.  It follows that it would be in the designer’s best interest to understand how bolts fail and to avoid those situations.

Consider a simple bolt modeled in SolidWorks:

Roundhead Bolt 12mm DIA x 152MM LONG ASTM A307

bolt in solidworks


It is worth noting that the tensile strength for that grade of bolt is approximately 60,000 PSI.  Therefore, using plain carbon steel as a template, the tensile strength was adjusted accordingly.

tensile strength of bolt


Next, we can set up a test scenario using SolidWorks Simulation where the bolt is fixed at the top with a base tensile load of 10,000 PSI applied at the bottom

solidworks simulation of bolt


We can now mesh the bolt

meshing the bolt in solidworks simulation


After running the Static analysis we can do a section plot to understand how the stress a distributed in the cross section of the bolt.  We find that the highest point of stress concentration occurs at the neck as expected with a value of 28,067 PSI.  

static analysis of bolt in solidworks simulation


Note that this value is fairly close to yield strength of the material 31,994 PSI.  If a stress value approaches the yield strength, the general assumption of linear behavior of the material begins to breakdown.  Therefore it is in our best interest to run a non-linear analysis as well.

stress anlaysis of bolt


Creating a new non-linear study and running a similar analysis we find that the actual stress is approximately 27,197 PSI. This value is less than the linear analysis but it is still close to yield. 
Given these results it would be in the designer’s best interest to either reduce the load, increase the bolt diameter or chose a higher grade bolt.
Sometimes bolt failure can occur due to other circumstances as well.  Specifications such as how much a bolt must be tensioned at installation can make a difference.  In other cases large batches can yield bolts with manufacturing defects which may fail below the yield stress.  


June 16, 2015

Understanding the Simulation Flow Wizard

Flow Wizard - How to Set up your Flow Anlaysis:


SolidWorks Simulation is a versatile software that allows a user to conduct analysis of a part in a virtual environment.  In order to help the user set up a problem correctly, SolidWorks has a built-in Study Advisor functionality that guides the user through the process of setting up an analysis. 

 Simulation is a large branch that includes static analysis, thermal analysis, frequency analysis, and also flow.  Flow simulation uses computational fluid dynamics (CFD) to enable the user to run liquid and gas analysis to understand fluid flow, heat transfer, and forces on component parts.  SolidWorks Flow Simulation has the Flow Wizard functionality, similar to the Study Advisor, to help users set up the flow analysis.

Consider a simple pipe as shown below.  To begin, let’s select the Flow Simulation tab and select Wizard at the top left.

solidworks flow simulation


A pop-up window should appear for Project Name.  This is where you will be able to enter the project name, comments and where you can select which configurations you’d like to add to the project

flow wizard solidworks


The next tab allows you to select and set your unit system.  You are able to control the unit of measurement as well as the number of decimal places shown for each measurement.

solidworks flow wizard


The next tab allows you to choose the analysis type.  This is an important choice.  With regards to the pipe we have modeled, are we interested in fluid flow within the pipe or are we interested in fluid flow over the pipe?  An internal analysis would be considered for an enclosed flow such as inside the pipe.  An external analysis would apply for an unbounded flow, or blow over an object.  Once you have decided on which type of analysis you may input additional physical features such as time dependence, gravity and rotation.


flow wizard solidworks


The next tab allows you to set your working fluid, it may be liquid, gas, compressible, non-compressible, etc.  
SolidWorks Flow simulation can analyze up to ten fluids of different types provided that you separate the areas of different fluids from each other.  

working fluid in flow simulation


The next tab indicates the wall conditions where you can treat them with different roughness or thermodynamic parameters such as adiabatic. 

parameter setting in flow wizard


The next tab allows you to set the initial conditions of your fluid flow including pressure, temperature and velocity.


fluid flow wizard


The last tab allows you to set the result resolution for your flow simulation.  This determines the accuracy of the result.  Higher accuracy generally requires longer runtimes.


results and geometry resolution flow wizard


The last step is to complete the wizard which should put you in a good position to start your flow analysis.

June 10, 2015

Drawing Alignment in SOLIDWORKS

Aligning Drawing

When drawings are created in SolidWorks a lot of time is spent in formatting the drawing.  SolidWorks offers many tools to help the user achieve the desired drawing format.  One such tool is the use of Alignment.

Consider a plate modeled in SolidWorks as shown below:

SOLIDWORKS DRAWINGS


To create a drawing from this model we go to File> Make Drawing from Part.

MAKE SOLIDWORKS DRAWING FROM PART


A blank drawing page will appear and the task pane will give you the option of selecting one of many standard drawing views.  In this case the Top view will be selected

top view in solidworks drawing


Click and drag the selected view onto the page.  Once the view is inserted into the page you have the option to modify the view scale which can be done in the Drawing View property box.

drawing view in solidworks


A drawing view may be copied by selecting the drawing view, using keyboard shortcut Ctrl+C to copy and Ctrl+V to paste a second copy of the drawing.  Note that the two drawings move independently from one another and are not linked.

drawing view solidworks


In order to align the two drawing views, select both views, right click and select Alignment from the quick menu.

drawing alignment solidworks


Alignment comes with multiple options.  Alignment may be applied to the horizontal or the vertical.  Alignment by the Origin will align the origin from one view to the other view.  Alignment by the Center will automatically alignment both drawings about the center.   This distinguishing feature is useful when aligning different drawing, detail views etc.
Once you make your selection on the type of alignment, the mouse cursor will change allowing you to select one of the drawing views.  Your choice of selection will make the drawing view the parent and the other, the child.


alignment of drawings in solidworks


Now your drawing views are aligned and the formatting is improved.  Please note that at any point you have the option to break the alignment by selecting the view, right click > Alignment > Break Alignment.  That will return the drawing views to a free state.


Blocks in Sketch

Sketching skills form the fundamental basis of SolidWorks software.  Parts, features, geometries and patterns are all dependent on the first initial sketch.  Therefore learning tricks and shortcuts can potentially positively impact your work flow.  

 Consider a simple part composed of an extruded rectangle as shown below:

sketching solidworks


There will be times when there are repetitions of complex sketch parts.  Whenever there are repetitions you may use SolidWorks pattern features to avoid recreating the part over and over or alternatively you  may choose to use a block.
  The original rectangle drawn requires a curve added to two edge.  The curve has been drawn separately from the part as shown:

solidworks pattern feature


Please note it is undefined and without reference.  Select all entities composing the curve, right click and select “Make Block” from the quick menu.  

blocks in sketch


Select the green check mark to accept the creation of the block

solidworks sketching


The curve now exists as a block and is free to move as a single unit. 

sketching in solidworks


You may copy and paste multiple copies of the block in the sketch.  Please note that if you edit the block, all instances will update to reflect the change.  It is also worth noting that the lines and points on the block may accept relations just like any sketch such as coincident relation and horizontal relation.  Two copies of the block have been added and applied to the top and bottom portion of our part.  A small sketched line completes a closed contour between the block and the original sketch.


blocks in sketch


Completing our changes we may leave the sketch window and rebuild the feature to show the boss-extrude has accepted the new sketch with two instances of a block. 

block sketch solidworks


This saves us the time and effort to recreate the same sketch multiple times.